自定义侧边栏
文档
自定義側邊欄
適用於 >= 3.8.0
側邊欄現在支持自定義了,可以添加自己喜歡的 widget。
可添加自己的 widget,也可以對現有的 widget 進行排序(博客資料和 公告這兩個固定,其它的能排序)
widget 排序
只需要配置 sort_order就行。(使用了 Flex 佈局的 order 屬性,具體可查看 mozilla 文檔。簡單來講,就是配置數字來實現排序,如果不配置,則默認為 0。數字越小,排序越靠前。
1 | aside: |
自定義 widget
如果你想添加自己的內容到側邊欄去,你可以自定義。
創建 widget.yml
在Hexo博客目錄中的source/_data(如果沒有 _data 文件夾,請自行創建),創建一個文件 widget.yml
格式
1 | top: |
參數詳解
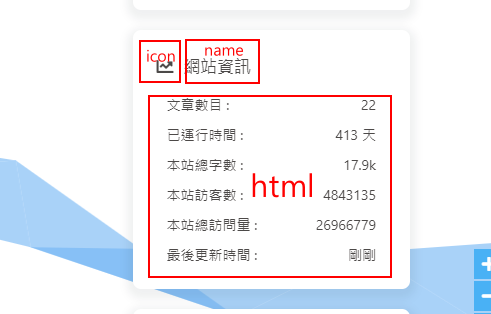
top: 創建的 widget 會出現在非 sticky 區域(即所有頁面都會顯示)
bottom: 創建的 widget 會出現在 sticky 區域(除了文章頁都會顯示)
| 參數 | 解釋 |
|---|---|
| class_name | 所創建的 widget 父類 class 名 (可選) |
| id_name | 所創建的 widget 父類 id 名(可選) |
| name | 所創建的 widget 標題 |
| icon | 所創建的 widget 圖標 |
| order | 所創建的 widget 排序 (可選) |
| html | 所創建的 widget 相關代碼 |

生成的 代碼 為
1 | <div class="card-widget 所寫的 class_name" id="所寫的 id_name" style="order: 所寫的 order"> |
如果你需要對添加的 widget 進行 UI 調整,請自行添加 css 到 inject 去。
例子
以 訪客地圖 為例子
獲取訪客地圖的 html 代碼
1
<script type="text/javascript" id="clstr_globe" src="//clustrmaps.com/globe.js?d=5V2tOKp8qAdRM-i8eu7ETTO9ugt5uKbbG-U7Yj8uMl8"></script>
創建 widget.yml
1
2
3
4
5
6
7
bottom:
- class_name: user-map
id_name: user-map
name: 訪客地圖
icon: fas fa-heartbeat
order:
html: '<script type="text/javascript" id="clstr_globe" src="//clustrmaps.com/globe.js?d=5V2tOKp8qAdRM-i8eu7ETTO9ugt5uKbbG-U7Yj8uMl8"></script>'運行 hexo

本博客所有文章除特别声明外,均采用 CC BY-NC-SA 4.0 许可协议。转载请注明来自 Jgwy-免费资源集中营!!


